使用Python和GDAL給圖片加坐標(biāo)系的實(shí)現(xiàn)思路(坐標(biāo)投影轉(zhuǎn)換)
**
使用Python和GDAL給圖片加坐標(biāo)系
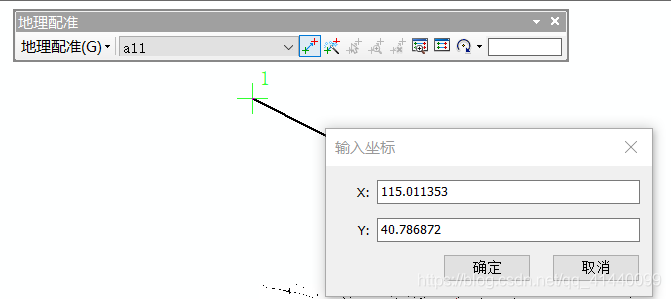
**假設(shè)你已經(jīng)知道arcgis地理配準(zhǔn)(如下圖內(nèi)容),懂一點(diǎn)python。
**
-目的和背景1.從地圖網(wǎng)站獲得一張PNG格式的截圖,已知坐標(biāo)系為WGS84和左上角坐標(biāo)。arcgis地理配準(zhǔn)再定義投影即可給它加上原圖的坐標(biāo)系。2.假設(shè)有上千張圖片,可用Python和GDAL給圖片加坐標(biāo)系。
-實(shí)現(xiàn)思路1.使用GDAL需要知道待投影圖片的地理坐標(biāo)信息、仿射矩陣參數(shù)。
仿射矩陣參數(shù)是干什么的?見:https://zhuanlan.zhihu.com/p/72184440主要含義:1)不同坐標(biāo)系的轉(zhuǎn)換,涉及到仿射變換,又稱仿射映射,是指在幾何中,一個向量空間進(jìn)行一次線性變換并接上一個平移,變換為另一個向量空間。2)仿射矩陣信息有六個參數(shù),描述的是柵格行列號和地理坐標(biāo)之間的關(guān)系:‘’’0:圖像左上角的X坐標(biāo);1:圖像東西方向分辨率;2:旋轉(zhuǎn)角度,如果圖像北方朝上,該值為0;3:圖像左上角的Y坐標(biāo);4:旋轉(zhuǎn)角度,如果圖像北方朝上,該值為0;5:圖像南北方向分辨率;‘’’
2.在arcgis使用一張圖片和三個角點(diǎn)的坐標(biāo)進(jìn)行地理配準(zhǔn),再定義投影完成坐標(biāo)轉(zhuǎn)換。
使用下面的代碼獲取仿射矩陣和投影參數(shù):
dataset = gdal.Open(’a.png’) print (dataset.GetGeoTransform())#仿射矩陣 print (dataset.GetProjection())#地圖投影信息# 打印結(jié)果為:# (116.33333, 8.321688443e-05, 0.0, 39.99999, 0.0, -6.223016769e-05)# ’GEOGCS['WGS 84', DATUM['WGS_1984', SPHEROID['WGS 84', 6378137, 298.257223563, AUTHORITY['EPSG', '7030']], AUTHORITY['EPSG', '6326']], PRIMEM['Greenwich', 0], UNIT['degree', 0.0174532925199433], AUTHORITY['EPSG', '4326']]’
3.批量獲取圖片的仿射矩陣
# coors是用來存儲圖片對應(yīng)左上角坐標(biāo)的字典。格式為{‘a(chǎn).png‘’:[116.33333,39.6],} image_list = os.listdir(’D:dd’) image_num = len(image_list) for k in range(image_num): if image_list[k].endswith(’.png’): img_name = img_none_path + ’/’ + image_list[k] img_pos_transf = (float(coors[image_list[k]][0]), 8.321688443e-05, 0.0, float(coors[image_list[k]][1]), 0.0, -6.223016769e-05)#根據(jù)第二步獲得像元分辨率和投影 print(img_pos_transf) img_pos_proj = ’GEOGCS['WGS 84', DATUM['WGS_1984', SPHEROID['WGS 84', 6378137, 298.257223563, AUTHORITY['EPSG', '7030']], AUTHORITY['EPSG', '6326']], PRIMEM['Greenwich', 0], UNIT['degree', 0.0174532925199433], AUTHORITY['EPSG', '4326']]’ def_geoCoordSys(img_name, img_pos_transf, img_pos_proj)#坐標(biāo)轉(zhuǎn)換的函數(shù)
4.給圖片加坐標(biāo)系的主要函數(shù)如下
來自文章 :https://blog.csdn.net/nominior/article/details/102737294
def def_geoCoordSys(read_path, img_transf, img_proj): array_dataset = gdal.Open(read_path) img_array = array_dataset.ReadAsArray( 0, 0, array_dataset.RasterXSize, array_dataset.RasterYSize) if ’int8’ in img_array.dtype.name: datatype = gdal.GDT_Byte elif ’int16’ in img_array.dtype.name: datatype = gdal.GDT_UInt16 else: datatype = gdal.GDT_Float32 if len(img_array.shape) == 3: img_bands, im_height, im_width = img_array.shape else: img_bands, (im_height, im_width) = 1, img_array.shape filename = read_path[:-4] + ’_proj’ + ’.tif’ driver = gdal.GetDriverByName('GTiff') # 創(chuàng)建文件驅(qū)動 dataset = driver.Create( filename, im_width, im_height, img_bands, datatype) dataset.SetGeoTransform(img_transf) # 寫入仿射變換參數(shù) dataset.SetProjection(img_proj) # 寫入投影 # 寫入影像數(shù)據(jù) if img_bands == 1: dataset.GetRasterBand(1).WriteArray(img_array) else: for i in range(img_bands):dataset.GetRasterBand(i + 1).WriteArray(img_array[i]) print(read_path, ’geoCoordSys get!’)
到此這篇關(guān)于使用Python和GDAL給圖片加坐標(biāo)系的實(shí)現(xiàn)思路(坐標(biāo)投影轉(zhuǎn)換)的文章就介紹到這了,更多相關(guān)Python GDAL坐標(biāo)投影轉(zhuǎn)換內(nèi)容請搜索好吧啦網(wǎng)以前的文章或繼續(xù)瀏覽下面的相關(guān)文章希望大家以后多多支持好吧啦網(wǎng)!
相關(guān)文章:

 網(wǎng)公網(wǎng)安備