python的Jenkins接口調用方式
本來非常喜歡偷懶
最好就是不干活那種
所以最近在研究把Jenkins模塊集成起來
做成傻瓜界面這樣就給他們用
本人Python搓望大神不要噴,多多指導
jenkins的Python模塊模塊安裝
pip:pip install python-jenkins
easy_install:easy_install python-jenkins
使用:
class jenkins_tools(): def __init__(self): cf = get_conf() self.username = cf.get(’jenkins’, ’username’) self.password = cf.get(’jenkins’, ’password’) self.php_jenkins = ’’’#本?拋約旱?enkins的conf文件 <project>#這里可以去抄jenkins的項目文件夾里面的配置文件 <actions/>#記得不要加xml頭,源碼哪里幫我們加了,自己加就是作死 <description></description>#項目需求不一樣,配置文件也不一樣,你們不要抄我的 <keepDependencies>false</keepDependencies> <properties> <hudson.model.ParametersDefinitionProperty> <parameterDefinitions><hudson.model.StringParameterDefinition> <name>Branch</name> <description></description> <defaultValue>%s</defaultValue></hudson.model.StringParameterDefinition> </parameterDefinitions> </hudson.model.ParametersDefinitionProperty> </properties> <scm /> <canRoam>true</canRoam> <disabled>false</disabled> <blockBuildWhenDownstreamBuilding>false</blockBuildWhenDownstreamBuilding> <blockBuildWhenUpstreamBuilding>false</blockBuildWhenUpstreamBuilding> <triggers/> <concurrentBuild>false</concurrentBuild> <builders> <hudson.tasks.Shell> <command>xxxxxxx</command> </hudson.tasks.Shell> </builders> <publishers/> <buildWrappers/> </project> ’’’ self.java_newjenkins = ’’’#本?諾牧磽庖桓?enkins的conf文件 <project> <actions/> <description></description> <keepDependencies>false</keepDependencies> <properties><hudson.model.ParametersDefinitionProperty> <parameterDefinitions> <hudson.model.StringParameterDefinition> <name>Branch</name> <description></description> <defaultValue>%s</defaultValue> </hudson.model.StringParameterDefinition> </parameterDefinitions></hudson.model.ParametersDefinitionProperty> </properties> <scm /> <canRoam>true</canRoam> <disabled>false</disabled> <blockBuildWhenDownstreamBuilding>false</blockBuildWhenDownstreamBuilding> <blockBuildWhenUpstreamBuilding>false</blockBuildWhenUpstreamBuilding> <triggers/> <concurrentBuild>false</concurrentBuild> <builders><hudson.tasks.Shell> <command>xxxx</command></hudson.tasks.Shell> </builders> <publishers/> <buildWrappers/> </project>’’’ def __conn_jenkins_server(self, url): try: #獲得一個jenkins的操作實例 server = jenkins.Jenkins(url, username=self.username, password=self.password) return server except Exception: logging.warning(’login jenkins failed!’) return None def create_project(self, host_ip, project_name, git_path, git_branch, url, environment): server = self.__conn_jenkins_server(url) if server: server.create_job(project_name, self.php_jenkins)#參數1寫的是項目名稱,參數2是xml文檔 return True else: return None def project_built(self, url, project_name, git_branch):#這個函數作用是構建項目 server = self.__conn_jenkins_server(url) server.build_job(project_name, {’Branch’: git_branch}) def check_project_exist(self, project_name, url):#這個函數是檢查項目是否已經存在雖然寫得很挫忘不要見怪 server = self.__conn_jenkins_server(url) name = server.get_job_name(project_name) if name is None: return False return True
詳細可以看官方文檔:http://python-jenkins.readthedocs.io/en/latest/api.html
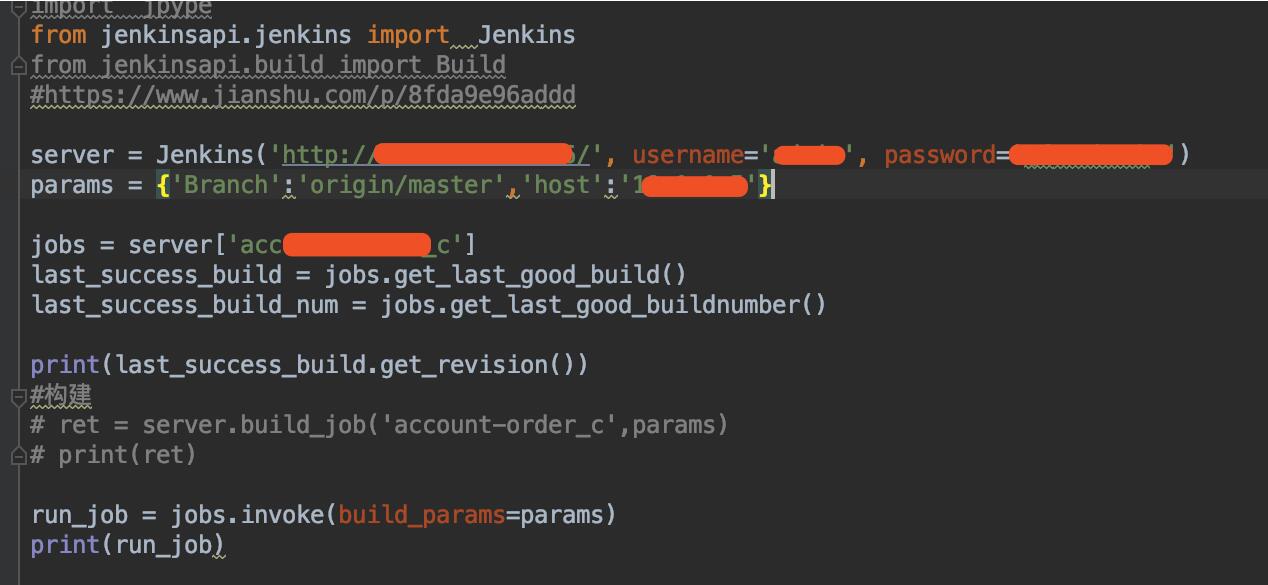
補充知識:python調用jenkinsapi
在通過python 調用jenkinsapi的時候,需要對一些作業進行定時對構建
報錯:
<title>Error 403 No valid crumb was included in the request</title>n</head>n<body><h2>HTTP ERROR 403</h2>
原因是在jenkins的安全配置里勾選里下面這個選項,在預防跨站點請求,將其勾掉即可。

以上這篇python的Jenkins接口調用方式就是小編分享給大家的全部內容了,希望能給大家一個參考,也希望大家多多支持好吧啦網。
相關文章:
 網公網安備
網公網安備