ssm+vue前后端分離框架整合實現(附源碼)
前言
本文針對Spring+SpringMVC+Mybatis后臺開發框架(基于maven構建)與vue前端框架(基于webpack構建)的項目整合進行介紹,對于ssm和vue單獨項目的搭建不作為本文的重點,而著重介紹兩者之間交互的要點。
SSM
項目結構
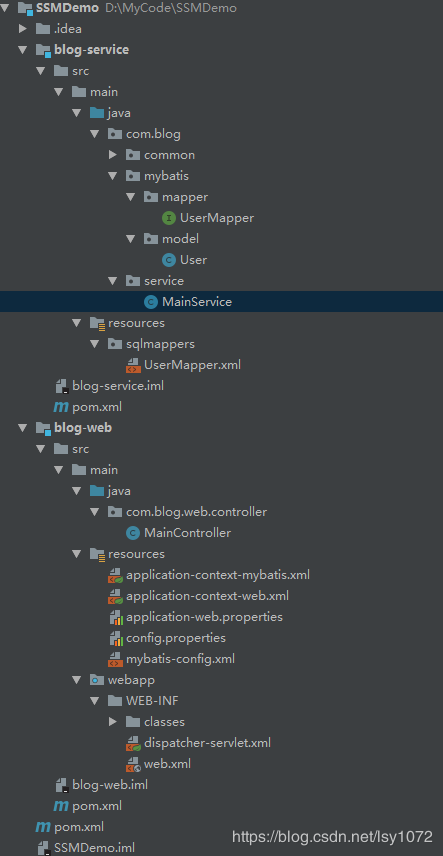
說明項目有service和web兩個子項目組成,web依賴于service,其中web主要是control層內容,service則對應service層,而MyBatis內容放在了service項目中,spring配置文件放在了web項目中。將control層和service層分離成兩個子項目,有利于項目的維護。
Vue

2.可以看出,這個是標準的使用webpack搭建的vue項目
前后端交互(重點)
重點來了,前后端交互無非是前端能夠訪問后端接口,并且成功接收到后端返回數據。在配置過程中,需要注意兩個點,一是配置后端接口地址,二是跨域問題。
配置后端接口地址
在vue中,使用的是axios發送ajax請求和后臺交互,我們需要main.js中配置axios默認訪問地址。
在src/main.js文件中增加
// 引用axios,并設置基礎URL為后端服務api地址var axios = require(’axios’)axios.defaults.baseURL = 'http://127.0.0.1:8080/blog/api'//設置全局,每次ajax請求攜帶cookies// axios.defaults.withCredentials = true// 將API方法綁定到全局Vue.prototype.$axios = axios
我們配置http://127.0.0.1:8080/blog/api為所有axios的默認請求地址,其中后臺端口號為8080,而vue項目默認的端口號也為8080,所有需要修改vue項目中的默認訪問端口號,改為8090(不與后臺端口沖突即可)。
在config/index.js修改

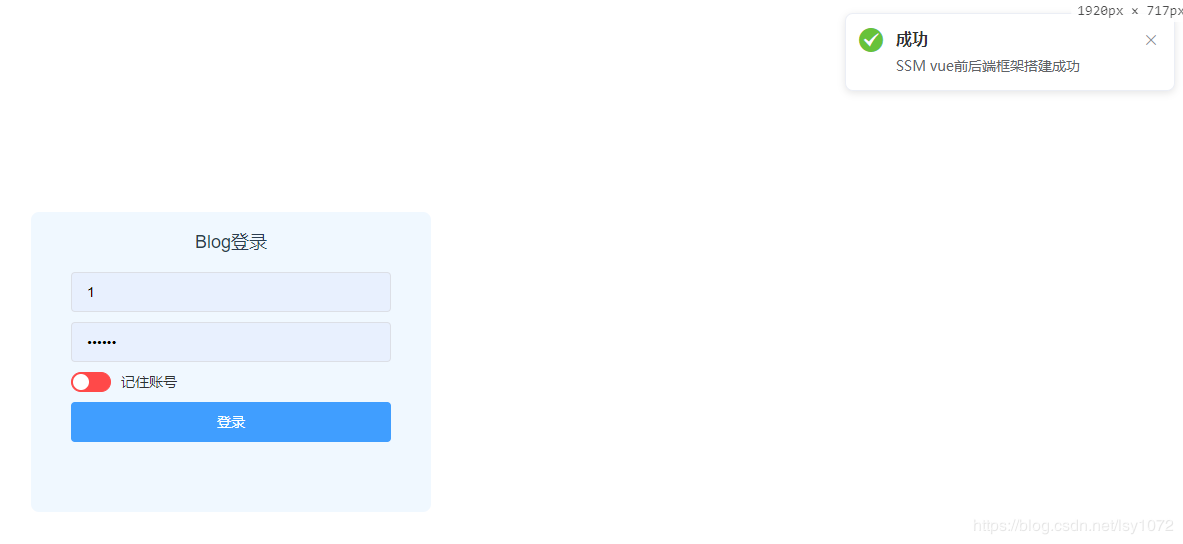
測試代碼:
created:function(){ var data = Qs.stringify({}); this.$axios .post(’/check’, data) .then(successResponse => { this.responseResult = JSON.stringify(successResponse.data) if (successResponse.data.code === 200) { this.$notify({ title: ’成功’, message: successResponse.data.message, type: ’success’ }); }else{ this.$notify({ title:'失敗', message:successResponse.data.message, type:’error’ }) } }) .catch(failResponse => {}) }
配置好之后,運行項目發現前端仍然是無法訪問后臺接口,出現以下報錯。可以看出是出現跨域問題了。

解決跨域問題
對于跨域問題,SpringMVC提供了注解@CrossOrigin處理該問題(想知道@CrossOrigin做了什么,請移步Spring @CrossOrigin 注解原理),只需要在對應的接口中增加@CrossOrigin即可(也可通過全局配置的方式設置,這里不做介紹)。
MainController.java:
package com.blog.web.controller;import com.blog.common.Result;import org.apache.log4j.Logger;import org.springframework.stereotype.Controller;import org.springframework.web.bind.annotation.CrossOrigin;import org.springframework.web.bind.annotation.RequestMapping;import org.springframework.web.bind.annotation.RequestMethod;import org.springframework.web.bind.annotation.ResponseBody;@Controller@RequestMapping('/blog/api')public class MainController { private Logger logger = Logger.getLogger ( MainController.class ); @RequestMapping ( value = '/check', method = RequestMethod.POST ) @ResponseBody @CrossOrigin public Result check () { logger.info('MainController run'); Result result = new Result(); result.setMessage('SSM vue前后端框架搭建成功'); return result; }}
重啟項目,返回正確結果。
源碼
后臺代碼:SSMDemo前端代碼:VueDemo
到此這篇關于ssm+vue前后端分離框架整合實現(附源碼)的文章就介紹到這了,更多相關ssm+vue前后端分離內容請搜索好吧啦網以前的文章或繼續瀏覽下面的相關文章希望大家以后多多支持好吧啦網!
相關文章:
 網公網安備
網公網安備